最好用的流程编辑器bpmn-js系列之ContextPad
最好用的流程编辑器bpmn-js系列文章
上一篇文章『最好用的流程编辑器bpmn-js系列之Palette』介绍了modeler模式下如何自定义左侧工具栏Palette,这篇文章将会介绍如果自定义ContextPad
以下演示代码基于上一节搭建好的vue环境,使用bpmn版本为当前最新版7.3.0
自定义ContextPad
自定义ContextPad与自定义Palette一样,有两种方式可以选择,第一种就是基于默认的ContextPad来修改,第二种就是完全写个新的ContextPad来替代默认的ContextPad,同样的这里就下完全自定义ContextPad,因为与自定义Palette高度相似,这里以具体代码为主
1.在custom目录下新建CustomContextPadProvider.js文件,内容如下
import { assign } from "min-dash";

export default function ContextPadProvider(
  config,
  injector,
  contextPad,
  modeling,
  elementFactory,
  connect,
  create,
  translate
) {
  this.modeling = modeling;
  this.elementFactory = elementFactory;
  this.connect = connect;
  this.create = create;
  this.translate = translate;
  config = config || {};

  if (config.autoPlace !== false) {
    this.autoPlace = injector.get("autoPlace", false);
  }

  contextPad.registerProvider(this);
}

ContextPadProvider.$inject = [
  "config.contextPad",
  "injector",
  "contextPad",
  "modeling",
  "elementFactory",
  "connect",
  "create",
  "translate"
];

ContextPadProvider.prototype.getContextPadEntries = function (element) {
  const {
    autoPlace,
    create,
    elementFactory,
    translate,
    modeling,
    connect
  } = this;

  function appendAction(type, className, title, options) {
    function appendStart(event, element) {
      var shape = elementFactory.createShape(assign({ type: type }, options));
      create.start(event, shape, {
        source: element
      });
    }

    var append = autoPlace
      ? function (event, element) {
        var shape = elementFactory.createShape(
          assign({ type: type }, options)
        );
        autoPlace.append(element, shape);
      }
      : appendStart;

    return {
      group: "model",
      className: className,
      title: title,
      action: {
        dragstart: appendStart,
        click: append
      }
    };
  }

  function removeElement(e) {
    modeling.removeElements([element]);
  }

  var actions = {};

  if (
    element.type === "bpmn:UserTask" ||
    element.type === "bpmn:SequenceFlow"
  ) {
    assign(actions, {
      edit: {
        group: "edit",
        className: "bpmn-icon-business-rule",
        title: translate("属性"),
        action: {}
      }
    });
  }

  assign(actions, {
    delete: {
      group: "edit",
      className: "bpmn-icon-trash",
      title: translate("Remove"),
      action: {
        click: removeElement
      }
    }
  });

  return actions;
};主要思路依然是构建最终输出的字段数据,可以根据不同类型的shape添加不同的ContextPad,以上代码就是默认所有shape都有删除按钮,然后给UserTask类型的shape和连线都添加了一个名为“属性”的按钮
同样的这里所需要的shape数据也可以参考上篇文章最后给出的那两个Github源码链接
2.在custom/index.js文件中添加如下内容将自定义的ContextPad导出
import CustomContextPadProvider from "./CustomContextPadProvider";

export default {
  __init__: ["contextPadProvider"],
  contextPadProvider: ["type", CustomContextPadProvider]
};这里只有自定义ContextPad的配置,如果你是想在自定义Palette的基础上再自定义ContextPad的话,将以上代码与原本的内容整合即可
3.在customModeler/index.js文件中编写自定义的CustomModeler类
import inherits from "inherits";

import Viewer from "bpmn-js/lib/Viewer";

import ZoomScrollModule from "diagram-js/lib/navigation/zoomscroll";
import MoveCanvasModule from "diagram-js/lib/navigation/movecanvas";

function CustomViewer(options) {
  Viewer.call(this, options);
}

inherits(CustomViewer, Viewer);

CustomViewer.prototype._modules = [].concat(Viewer.prototype._modules, [
  ZoomScrollModule,
  MoveCanvasModule
]);

export { CustomViewer };同样的如果你想在自定义Palette的基础上再自定义ContextPad,则在之前的代码基础上与以上代码整合
4.在页面上引用自定义的CustomModeler以替代原本引用的BpmnModeler类,这样就能用到我们自定义的Palette啦
import { xmlStr } from "../mock/xmlStrPreview";
import { CustomModeler } from "../components/customBpmn";

export default {
  ...
  methods: {
    init() {
      const canvas = this.$refs.canvas;
      this.bpmnModeler = new CustomModeler({
        container: canvas
      });
      this.createNewDiagram();
    },
    async createNewDiagram() {
      try {
        const result = await this.bpmnModeler.importXML(xmlStr);
        const { warnings } = result;
        console.log(warnings);
      } catch (err) {
        console.log(err.message, err.warnings);
      }
    }
  }
};
最终效果如下:
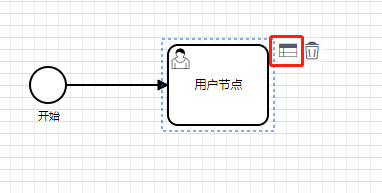
点击处理
bpmn.js给节点关联属性是通过右侧面板Properties-panel来实现的,其核心是对xml文件的修改,但我们并没有这样用,而是直接给每个节点关联一个表单,这个节点的所有数据都保存在这个表单里,后台单独存于数据库,这里所说的节点包含图形shape和连线SequenceFlow等流程图里的元素,节点ID与表单数据一一对应
节点要关联表单数据,就需要用到我们上边添加的名为“属性”的按钮,当点击“属性”按钮时出现表单,因为不同类型的节点需要弹出不同的表单,所以在点击按钮之后主程序也需要知道点击的节点类型等数据,这就涉及到了组件间的数据传递,试了很多方法都不行,最终只能借助于借助于store来实现了,具体代码如下
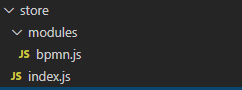
1.在store目录下新建modules目录,modules目录下创建模块化文件bpmn.js,目录结构如下
2.在bpmn.js中编写如下代码
const bpmn = {
  state: {
    nodeVisible: false,
    nodeInfo: {}
  },
  mutations: {
    TOGGLENODEVISIBLE: (state, visible) => {
      state.nodeVisible = visible;
    },
    SETNODEINFO: (state, info) => {
      state.nodeInfo = info;
    }
  },
  actions: {}
};

export default bpmn;想要了解以上代码的意思,我们需要先了解下Vuex的基本思想:当我们在页面上点击了一个按钮,它会触发一个action,action随后会执行一个mutation,mutation会去改变state,当state改变后页面就能根据state来进行相应的处理了
然后再来看上边的代码,用到了Vuex基本思想里边的state和mutations,其中state为单一状态树,简单理解为我们定义的变量,全局变量,其他组件可以获取的到的变量,而想要修改state里定义的变量就必须通过mutations来实现,mutations就定义了两个事件来对应修改state里的两个变量
state里定义的两个变量分别为用来记录表单展示状态的nodeVisible以及点击节点信息的nodeInfo,默认情况下nodeVisible为false,表示表单为隐藏状态,当点击ContextPad的的“属性”按钮时修改为true,展示表单,同时会把点击的节点信息赋予nodeInfo,这个后边代码会有实现
想要定义的store生效还需要以下两步进行store挂载及引用
3.store/index.js中编写如下代码挂载store
import Vue from "vue";
import Vuex from "vuex";

import bpmn from "./modules/bpmn";

Vue.use(Vuex);

export default new Vuex.Store({
  state: {},
  mutations: {},
  actions: {},
  modules: { bpmn }
});4.在main.js中引入store
import store from "./store";

new Vue({
  store
}).$mount("#app");以上就定义好了store,接下来就是使用store了,首先需要处理的是,当点击ContextPad里的“属性”按钮时,修改store里nodeVisible和nodeInfo值
5.修改CustomContextPadProvider.js文件,给action添加click方法,click方法修改store里定义的state
function clickElement(e) {
  store.commit("SETNODEINFO", element);
  store.commit("TOGGLENODEVISIBLE", true);
}

if (
  element.type === "bpmn:UserTask" ||
  element.type === "bpmn:SequenceFlow"
) {
  assign(actions, {
    edit: {
      group: "edit",
      className: "bpmn-icon-business-rule",
      title: translate("属性"),
      action: {
        click: clickElement
      }
    }
  });
}对store的修改只能通过store.commit来实现
6.最后在页面中就可以借助computed和watch来实现对store里数据的获取以及对页面的处理
export default {
  ...
  data() {
    return {
      userTask: false,
      scriptTask: false,
      sequenceFlow: "",
      formData: {
        name: "",
        type: ""
      }
    };
  },
  computed: {
    task: {
      get: function() {
        const that = this;
        const element = this.$store.state.bpmn.nodeInfo;

        if (element.businessObject) {
          if (element.businessObject.$type === "bpmn:UserTask") {
            that.formData.type = "用户任务";
            that.formData.name = element.businessObject.name;
            that.userTask = this.$store.state.bpmn.nodeVisible;
          }

          if (element.businessObject.$type === "bpmn:SequenceFlow") {
            that.sequenceFlow = element.businessObject.name;
            that.scriptTask = this.$store.state.bpmn.nodeVisible;
          }
        }

        return false;
      },
      set: function(val) {
        this.$store.state.bpmn.nodeVisible = val;
      }
    }
  },
  watch: {
    task(val) {}
  }
};
最终实现的效果如下

但这里有一个问题,就是当我在表单里修改了节点名称,也就是节点的name属性时不会同步到左侧的流程图节点上,那该如何实现同步呢?也很简单,修改下watch即可
watch: {
  task(val) {},
  userTask(val) {
    this.$store.state.bpmn.nodeVisible = val;
  },
  sequenceFlow(val) {
    const element = this.$store.state.bpmn.nodeInfo;
    const modeling = this.bpmnModeler.get("modeling");
    modeling.updateLabel(element, val);
  },
  "formData.name": {
    handler(val, old) {
      const element = this.$store.state.bpmn.nodeInfo;
      const modeling = this.bpmnModeler.get("modeling");
      modeling.updateLabel(element, val);
    },
    deep: true
  }
}获取store里的值然后通过modeling.updateLabel方法来更新节点的名称,至此问题完美解决
写在最后
接触bpmn-js不久,且第一次用VUE,边学边写,文章难免出错,各位多多包含。bmpn系列的文章已经写了六篇,至此我们的使用已经基本到此,感谢各位小伙伴的支持。除了这几篇文章外,我还创建了BPMN的主页:https://blog.ops-coffee.cn/bpmn内容更为丰富,包含了一些这系列文章中没有的内容,例如API列表、ICON列表等,欢迎查看
部分小伙伴对流程编辑器不了解,或是对BPMN不了解,我搭建了个在线的Demo: https://bpmn.ops-coffee.cn,点击链接即可轻松体验,建议PC端打开效果更好
