使用JS自动生成文字头像
这是一篇简单的关于LetterAvatar的使用文章,如果你是专业的前端或者已经了解这个了,可以关闭退出了无需再看接下来的内容。本文仅是做个简单的记录当做给自己看的笔记
平常遇到有意思的网站或者好用的在线工具我都会放进收藏夹收藏下来,为了方便管理这些收藏的网站,我写了个简单的导航站
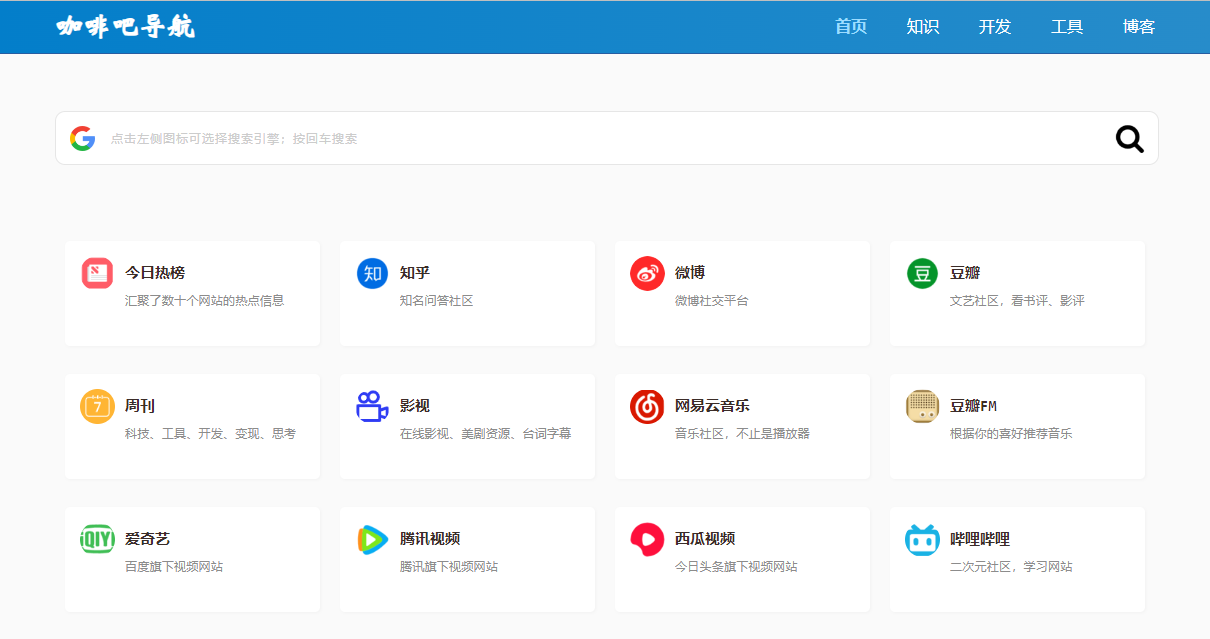
每个收藏的网站都是由一个图标、一个名字加上一段简单的介绍组成,名字和简介都是文字处理起来比较简单,图标就想对麻烦一点了,刚开始我都是找到网站的ICON地址直接使用这个链接,时间长了部分网站的ICON地址改变了,就导致页面加载不到了,这不仅拖累了页面的整体加载时间,并且图标不显示还比较丑
一个简单的处理方式是每次都把图标给下载下来保存到本地或者云存储上,这样依然比较麻烦,并且还占用存储空间,由于这个导航站还是托管在Github上,大量的图标加载同样会拖慢页面的速度,于是我在想能不能自动生成每个站点的图标,就像钉钉会为每个用户自动生成一个文字头像一样。于是很容易的在Github上找到了这个叫LetterAvatar的项目
这个项目非常简单,核心就是下边的这段JS
<script>
    /*
     * LetterAvatar
     *
     * Artur Heinze
     * Create Letter avatar based on Initials
     * based on https://gist.github.com/leecrossley/6027780
     */
    (function(w, d){
        function LetterAvatar (name, size, color) {

            name  = name || '';
            size  = size || 60;

            var colours = [
                    "#1abc9c", "#2ecc71", "#3498db", "#9b59b6", "#34495e", "#16a085", "#27ae60", "#2980b9", "#8e44ad", "#2c3e50",
                    "#f1c40f", "#e67e22", "#e74c3c", "#ecf0f1", "#95a5a6", "#f39c12", "#d35400", "#c0392b", "#bdc3c7", "#7f8c8d"
                ],

                nameSplit = String(name).split(' '),
                initials, charIndex, colourIndex, canvas, context, dataURI;


            if (nameSplit.length == 1) {
                initials = nameSplit[0] ? nameSplit[0].charAt(0):'?';
            } else {
                initials = nameSplit[0].charAt(0) + nameSplit[1].charAt(0);
            }

            if (w.devicePixelRatio) {
                size = (size * w.devicePixelRatio);
            }

            charIndex     = (initials == '?' ? 72 : initials.charCodeAt(0)) - 64;
            colourIndex   = charIndex % 20;
            canvas        = d.createElement('canvas');
            canvas.width  = size;
            canvas.height = size;
            context       = canvas.getContext("2d");

            context.fillStyle = color ? color : colours[colourIndex - 1];
            context.fillRect (0, 0, canvas.width, canvas.height);
            context.font = Math.round(canvas.width/2)+"px Arial";
            context.textAlign = "center";
            context.fillStyle = "#FFF";
            context.fillText(initials, size / 2, size / 1.5);

            dataURI = canvas.toDataURL();
            canvas  = null;

            return dataURI;
        }

        LetterAvatar.transform = function() {

            Array.prototype.forEach.call(d.querySelectorAll('img[avatar]'), function(img, name, color) {
                name = img.getAttribute('avatar');
                color = img.getAttribute('color');
                img.src = LetterAvatar(name, img.getAttribute('width'), color);
                img.removeAttribute('avatar');
                img.setAttribute('alt', name);
            });
        };


        // AMD support
        if (typeof define === 'function' && define.amd) {

            define(function () { return LetterAvatar; });

        // CommonJS and Node.js module support.
        } else if (typeof exports !== 'undefined') {

            // Support Node.js specific `module.exports` (which can be a function)
            if (typeof module != 'undefined' && module.exports) {
                exports = module.exports = LetterAvatar;
            }

            // But always support CommonJS module 1.1.1 spec (`exports` cannot be a function)
            exports.LetterAvatar = LetterAvatar;

        } else {

            window.LetterAvatar = LetterAvatar;

            d.addEventListener('DOMContentLoaded', function(event) {
                LetterAvatar.transform();
            });
        }
    })(window, document);
</script>
LetterAvatar的使用也是非常的简单,主要就是替换img标签,具体可参考下边的用法
<img width="256" height="256" avatar="decentralized Market" color="#0D8ABC">
<img class="round" width="256" height="256" avatar="decentralized Market" color="#0D8ABC">其中width和height都是img标签原本就有的属性,代表图片的宽度和高度,而avatar和color为LetterAvatar特有的属性,avatar用来配置显示的文字,支持字母和汉字,显示每个单词的首字母,若有多个单词则会显示每个单词首字母,color用来配置文字的底色。如果想要圆角图标设置class为round即可
有了这个插件,那自动生成网站的图标就容易多了,直接把原本图标的img用以上特殊的img标签替换即可,替换后的效果是这样的
代码不算难,使用更是简单,但就是这么几行代码帮我解决了大问题
